The final composite when i'd rendered out my sequences from maya into after effects, the sequences didn't match up so as i did this on the day of hand in i had to just key frame the bumps in AE which is why it's not as good as it was when in Maya.
Evaluation
I feel that i certainly didn't give my all to this project, which is a shame because towards the end where i was concentrating on the work i found that i was getting into it much more.
Maybe i found it difficult to get my head down because i wasn't sure of the process of what was involved, and procrastination was a winner for the most part.
This isn't like me to neglect a project as i thought it was close to last terms unit. I feel that it is certainly a good thing to learn about maya live as last term i thought i wasn't really into compositing, this was because again, there was no goal for me, i didn't try and understand the production process and the industry workflow standards.
If i were to do this again i believe that it would be much much better, and i plan to try it again because i want to prove to myself that i am capable of getting this right. I am happy that i can use this terms knowledge and go forth myself. I didn't even know what Maya Live was!!
Saturday, 6 March 2010
Animation and Tracking
Here are the playblasts from maya with the animation of the dino tracked in the scene.
Lighting
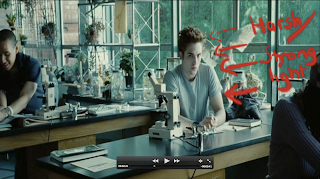
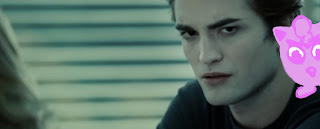
So i can't just stick my dino in without being lit properly in the scene, so as i was watching the scene we have some cuts where the lighting is soft on the facial features, then as we turn to Edward we are met with harsh lighting.
Strong directional lights for the dino

Soft spot light so i can have a feather on the edges maybe
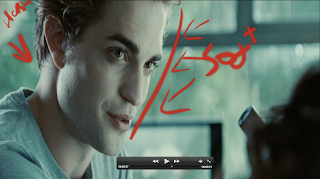
Even though i've written that the lighting is soft here, compared to the next shot with Bella, it is quite harsh.
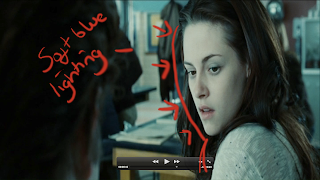
Also i'm thinking to set the colour of the light to a soft pale blue as that's the grading of the film.
Tuesday, 2 March 2010
Problem
So after having a little fiddle with the rig, i realized that when i imported my character into the MayaLive scene it was too big, and i had no way of successfully scaling him down to fit the scene.
When i'd try and import him in with different scale settings the rig wouldn't resize with the mesh, also the problem i had with the left ear means when i re combine the mesh to the rig the ear spins in on itself. All crazy business.
So as it's being close to the deadline, i have decided to just admit defeat on JP and bring in another rig, which is a little baby dinosaur. I chose this dinosaur because the rig scales, it's a simple rig and i wanted to have a bi pedal rig as this was what JP was.
I have had a play with the dinosaur rig and all seems to work as i want it to.
So now i have the five scenes to animate on top of, and i've tested the dinosaur with the tracking, all works well. TICK TOCK!

Saturday, 27 February 2010
Rigged animation test
Ok so i have now rigged my Jigglypuff and here are the test animations, the rig is rather basic as my character doesn't seem to do too much on screen, also i have included a video of how the jigglypuff moves in the cartoon..
The position of the feet vary as when jp is standing still the feet point out, when modeling i decided to model the feet separate.
Ear Wiggle Test
Feet and hands Test
Being rusty on my rigging and short on time, i realized i haven't added a maing body controller so i can't stand and tilt JP on one leg. Also i would like to add attributes to the toes so that i can have him tippy toeing up. The feet are not easily controlled in that i can't swizzle them from side to side, so i will have these checked over before i animate in the scene.
Also when i import my JP in a maya live scene, my JP is huge and i'm not sure how to resize him so that may be to do with how i have rigged it.
I'm annoyed i cannot find my book which helped me rig last term, and this is meant to be such a simple rig!
The position of the feet vary as when jp is standing still the feet point out, when modeling i decided to model the feet separate.

Ear Wiggle Test
Feet and hands Test
Being rusty on my rigging and short on time, i realized i haven't added a maing body controller so i can't stand and tilt JP on one leg. Also i would like to add attributes to the toes so that i can have him tippy toeing up. The feet are not easily controlled in that i can't swizzle them from side to side, so i will have these checked over before i animate in the scene.
Also when i import my JP in a maya live scene, my JP is huge and i'm not sure how to resize him so that may be to do with how i have rigged it.
I'm annoyed i cannot find my book which helped me rig last term, and this is meant to be such a simple rig!
Friday, 26 February 2010
A little velvet..
Just for a nicer look i have applied a plush velvet shader onto the model of my Jigglypuff.

I had to set up the ramp shader in the different shades of pink to depict the different shades.

and here is the outcome!


I had to set up the ramp shader in the different shades of pink to depict the different shades.

and here is the outcome!

Another Schedule
This is a clearer version of the schedule. The different colour sections act as the dependencies, so i wouldn't be able to continue without completing one colour first.


Wednesday, 24 February 2010
problems and solutions
Just to note some difficulties when tracking are that i have had my sphere bobbing on the scene i figured that if i wanted to keep the Jigglypuff still on the scene i can simply key frame frame 1 and key frame the last frame the position i wish for JP to stay. This worked really well.
Also on one of the shots where Bella is walking up to the desk from the door, the camera spins around and i wanted to have JP already sat on the table as the camera swings round. Though when i tried this the table where JP was sat, the table and microscope are coming into focus and you don't get a good track on out of focus shots as the track point bounces about.
Also for the shot where the teacher puts his hand on the desk, because the teacher walks back and forth on the scene i had to cut the clip into two so that i could set clean track points which don't get cut off by the body or hand of the teacher.
Work Schedule
This below is basically a chart showing the amount of weeks to work with and what i needed to do in this project. I have forgotten to add updating the journal to this but that is ongoing all the time. But as you can see that the colour represents how long i will spend on that section in my 9 weeks, some overlap so i can work on more than one thing at a time.


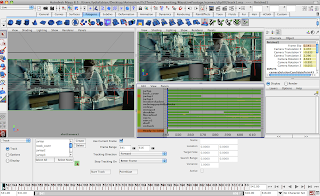
Correction on Clip004
That big wobble we had on the last playblast on clip which we can fix by selecting the camera in the scene>animation editor>Graph Editor.
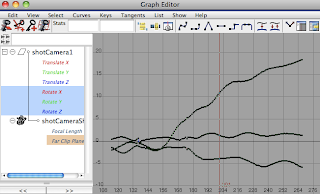
In this first shot we can see the wobble about 140 frames in, this is in the rotation and translate axis.
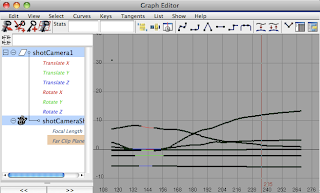
Here i have simply just deleted the key frames and created a smoother curve in the graph editor of the camera.
But then after talking with Steve i realized i've ben over complicating the tracking and tracking points when using MayaLive.
So here is a screenshot showing only a few tracking points placed sparsely on the screen. I have added a sphere to represent the Jigglypuff to see how effective the tracking has been.
When i went in to solve i got all green which is a first! so in the screenshot below we can also see the camera movement graph editor on the bottom left is in a clean line and slight curve.
Here is the end result which has worked really well so i will need to go back and re do my other scenes so that i can get a cleaner and smoother camera movements.
Also i am able to snap the sphere onto the origin of the tracking point,

This keeps the sphere locked onto that point which i could use if i have Jigglypuff sat on the desk. However for this clip i wanted JP getting ready for jumping up in front of Bella's face

In this first shot we can see the wobble about 140 frames in, this is in the rotation and translate axis.

Here i have simply just deleted the key frames and created a smoother curve in the graph editor of the camera.
But then after talking with Steve i realized i've ben over complicating the tracking and tracking points when using MayaLive.
So here is a screenshot showing only a few tracking points placed sparsely on the screen. I have added a sphere to represent the Jigglypuff to see how effective the tracking has been.

When i went in to solve i got all green which is a first! so in the screenshot below we can also see the camera movement graph editor on the bottom left is in a clean line and slight curve.

Here is the end result which has worked really well so i will need to go back and re do my other scenes so that i can get a cleaner and smoother camera movements.
Also i am able to snap the sphere onto the origin of the tracking point,

This keeps the sphere locked onto that point which i could use if i have Jigglypuff sat on the desk. However for this clip i wanted JP getting ready for jumping up in front of Bella's face
Tuesday, 23 February 2010
storyboard
1.

First sign we have JP in the scene it is sat on the table and we have 3 seconds on screen, just looking around and towards Bella.
2.

The camera goes back to a close up of Bella and on the swing round as she walks to the desk, JP is again watching Bella.
3.

JP follows Bella with eyes.
4.

Camera cuts to a behind the table shot and JP is turning around.
5.

JP Turned around curious.
6.

Between Edward and Bella talking JP jumps up in the shot with Bella trying to get Edwards attention.
7.

JP jumping higher
8.

We do have some table shot time where JP will be looking at Bella walking backwards until JP becomes aware of the teachers hand about to squish JP on the desk.
9.

So JP see's this and has jumped to the side out of the way.
10.

We next have the clip about winning the golden onion for the class, JP is then really excited and jiggling side to side.
i have worked out that there's roughly 27-30 seconds of on screen animation for JP.
What i have left to do now is;
- to complete the JP rig/blendshapes
- to sort tracking and get help for wobble shot
- lighting in the scene.
Monday, 22 February 2010
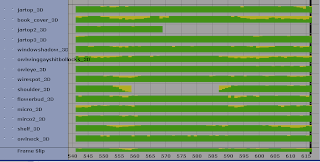
Clip004
Having trouble with the tracking on clip004, so i added more tracking points which seems to have worked well apart from the one major bump and i can't figure out how to fix it. I have tried adding more tracking points however this just makes the camera worse.
Before adding more tracking points

After adding more tracking points

Playblast with bump on camera
Quite an obvious bump.
So i thought by adding more tracking points it would straighten out the problem though it just got worse, as seen in the final solve here;

Playblast with more track points.
We can see from this data that the major bump slip is still there however there are more red zones which isn't good.
I will continue to track the other clips and come back to this and ask for help if i cannot fix it myself.
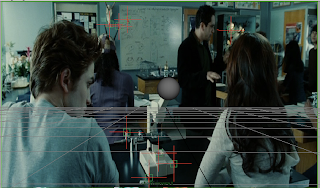
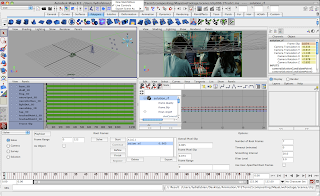
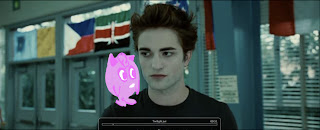
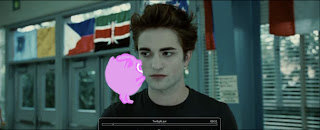
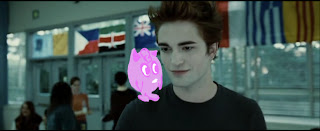
Maya Live - clip 002
So after cutting up the different shots of this scene in AE and exporting them as a tiff image sequence, i was then able to bring them into maya live and set up the different tracking points for the scene before using the solve.
Setting up the track points
Ok so when setting up the track points you need to keep creating until the 'ready to solve' is in green, and we go back in to add more track points if the solve wasn't too successful
Using the solve and refine
But luckily for me my solve worked great and here's the shot below;
This clip was so short that i didn't need to have very many track points for the solve to work. The pink cylinder is to represent my Jigglypuff on the table and i'd say that there is not problem with the camera movement so this shot is ready to go.
Setting up the track points

Ok so when setting up the track points you need to keep creating until the 'ready to solve' is in green, and we go back in to add more track points if the solve wasn't too successful
Using the solve and refine

But luckily for me my solve worked great and here's the shot below;
This clip was so short that i didn't need to have very many track points for the solve to work. The pink cylinder is to represent my Jigglypuff on the table and i'd say that there is not problem with the camera movement so this shot is ready to go.
Sunday, 21 February 2010
The New Clip
I feel i have neglected to keep the blog up to date with what i am doing by not clearly stating my intentions.
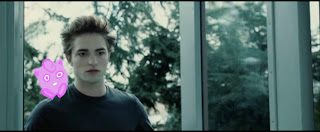
I am working from the scene in Twilight where we are in the biology lesson with Edward and Bella, and i intend to animate a Jigglypuff into the scene where it will be animated on the desk surface. Here is the clip i am using below ;
I have worked out the amount of camera time where the table is in shot is roughly 27 - 30 seconds, with 11 cuts for the different camera angles and a quick look of the lighting is quite subtle on some shots with Bellas face however with Edwards close ups the lighting is harsh so i need to bear the difference in mind when lighting my scene.
Jigglypuff
I am modeling, rigging and animating my own Jigglypuff onto the scene, i will be wanting this character to jump, walk, roll, wiggly ears and hands and have clean facial expressions. I am going to be looking at using blendshapes or if that's not plausible i will just work some ik handles for expression like i did for my gorilla last term.
Thursday, 11 February 2010
Formative
After talking with Steve about the clip i had chosen and story-boarded, he recommended that i use the second of the three clips and not my original idea. This was because on the footage there are no clear tracking points and that would make it difficult to track a jigglypuff onto the moving character.
So instead i will now be using the biology scene where Edward first talks to Bella.
Because of my download of twilight there was a problem when bringing in the image sequence into Maya Live shown in the below picture.
Basically for some reason no matter what setting i used for the screen size the image sequence didn't become visible. So this may be because the rip i have from the internet would may have been cropped so then it wont fit the standard settings. Also the size of the film may have been cropped so that it is a smaller file size to be sent on the internet. Steve also said that the higher the pixel resolution the better so that i have more details to track onto, whereas my pixel count is low and that basically leads to the pixel edges blurring with one another to cover and fill in the space.
So i only realized this after i had clipped up all the different scenes to track, i have now got the clean footage ripped from a legitimate dvd so i will hopefully have a higher pixel count and a normal screen size so it will import into Maya Live.
So now i need to
- Re-storyboard the new scene
- Track the footage
- Rig the jigglypuff
- Lighting in the scene
- Animate jigglypuff
So instead i will now be using the biology scene where Edward first talks to Bella.
Because of my download of twilight there was a problem when bringing in the image sequence into Maya Live shown in the below picture.

Basically for some reason no matter what setting i used for the screen size the image sequence didn't become visible. So this may be because the rip i have from the internet would may have been cropped so then it wont fit the standard settings. Also the size of the film may have been cropped so that it is a smaller file size to be sent on the internet. Steve also said that the higher the pixel resolution the better so that i have more details to track onto, whereas my pixel count is low and that basically leads to the pixel edges blurring with one another to cover and fill in the space.
So i only realized this after i had clipped up all the different scenes to track, i have now got the clean footage ripped from a legitimate dvd so i will hopefully have a higher pixel count and a normal screen size so it will import into Maya Live.
So now i need to
- Re-storyboard the new scene
- Track the footage
- Rig the jigglypuff
- Lighting in the scene
- Animate jigglypuff
Tuesday, 9 February 2010
Storyboard on live footage.
1

2
3
4
5
6

7

8
9

This shows my rough planning clearer than the storyboards.
After this i need to
- Choose my other clip so i can add the 10 seconds,
- I then need to use Maya Live to track the footage (currently i do not have Premier or Final Cut on my mac so i can't clip the movie file to do the tracking. I shall do this tomorrow on a friends mac)
- Also i need to rig up my Jigglypuff and do some test animations to make sure that Jigglypuff will do what i want in the scene, which isn't that active.

2

3

4

5

6

7

8

9

This shows my rough planning clearer than the storyboards.
After this i need to
- Choose my other clip so i can add the 10 seconds,
- I then need to use Maya Live to track the footage (currently i do not have Premier or Final Cut on my mac so i can't clip the movie file to do the tracking. I shall do this tomorrow on a friends mac)
- Also i need to rig up my Jigglypuff and do some test animations to make sure that Jigglypuff will do what i want in the scene, which isn't that active.
Rough Storyboards
Ok so i checked the timing of the scene and the first clip i am working from will be when we first see Edward and his Jigglypuff. No on else can see his jigglypuff apart from Edward.
The clip runs for 30 seconds and there will be 20 seconds of animation in the shot, 30 seconds of animation are needed as a minimum requirement so i will be choosing between two other clips. These being when Bella and Edward are in the canteen or the piano scene, which will help to increase the amount of animation i will present for hand in. This scene i have chosen has great minimal camera movement and the lighting is not irregular but quite clean which is good for working with, i am soon to find out when i take it into maya live.

I will be showing this storyboard with live shots from the film so we can view it more clearly but this is my roughing out.
1. Edward is first seen entering the canteen, jigglypuff is hardly seen as sat on his right shoulder.
2 + 3. Jigglypuff comes into full shot as Edward turns to open the door.
4. As Edward walks through the canteen Jigglypuffs attention is focussed on the girls conversation and is watching them.
5. Jigglypuff shown watching them.
6. Jigglypuff whispers into Edwards ear which makes him smile.
7. When Edward is sat at the table Jigglypuff will hop up onto his other shoulder
8. When we cut back to Edward close up, Jigglypuff is sticking its tongue out at Bella.
When i watched the clip back i think it will make sense to switch 5 and 6 so Jigglypuff is whispering into Edwards ear before then seen looking away as Edward smiles.
Monday, 8 February 2010
Jigglypuff
So after much thinking i've been trying to get motivated for this unit, the idea that stuck was the thought of a Jigglypuff in Twilight. So i thought about where this little pokemon could be, i need to draw up my storyboards but i have it clear in my head so no worries.
Firstly i need a Jigglypuff which i can animate.
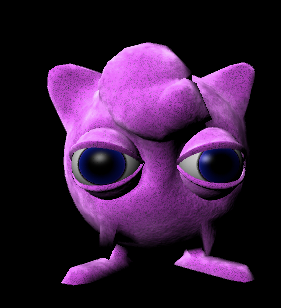
I had a hunt online for a rig but sadly that wasn't a success, so i have decided to go on and make my own Jigglypuff. Today i have modelled a Jigglypuff in Maya and i plan to move onto rigging tomorrow, this character shouldn't be too difficult to rig as it's pretty much just a ball with legs, little flappy arms and sometimes a mouth which im thinking to do some quick simple blend shapes with as im not after any thing complex like last term felt like.
Jigglypuff -

Using maya i just created a sphere and working with extruding faces where needed.

I had imported a set of eye's i had made and used for my gorilla last term.

Working to reference images i had to draw my top and side profile shots.

It's difficult to see if the feet were just attached to the sphere so i decided to do little legs and feet so this would be easier to rig and for the movement. I had looked on youtube to see how this character moves, mostly just rolling its weight from side to side if not power jumping in the air.

The quiff was difficult to see how it worked, but in the end i got the hang of it, i'd juse needed to extrude another face for the curl. I was feeling pretty happy here about my modelling as it actually looks like the Jigglypuff, however i noticed something went wrong with the left ear with more faces than i wanted inside the ear. So i had to re model the ear.


I'm wondering whether the feet need to be longer or further round the back of the body for equal balance. Also i need to add in the mouth so i can put in my blend shapes.
Cool. Storyboards to come.
Firstly i need a Jigglypuff which i can animate.
I had a hunt online for a rig but sadly that wasn't a success, so i have decided to go on and make my own Jigglypuff. Today i have modelled a Jigglypuff in Maya and i plan to move onto rigging tomorrow, this character shouldn't be too difficult to rig as it's pretty much just a ball with legs, little flappy arms and sometimes a mouth which im thinking to do some quick simple blend shapes with as im not after any thing complex like last term felt like.
Jigglypuff -

Using maya i just created a sphere and working with extruding faces where needed.

I had imported a set of eye's i had made and used for my gorilla last term.

Working to reference images i had to draw my top and side profile shots.

It's difficult to see if the feet were just attached to the sphere so i decided to do little legs and feet so this would be easier to rig and for the movement. I had looked on youtube to see how this character moves, mostly just rolling its weight from side to side if not power jumping in the air.

The quiff was difficult to see how it worked, but in the end i got the hang of it, i'd juse needed to extrude another face for the curl. I was feeling pretty happy here about my modelling as it actually looks like the Jigglypuff, however i noticed something went wrong with the left ear with more faces than i wanted inside the ear. So i had to re model the ear.


I'm wondering whether the feet need to be longer or further round the back of the body for equal balance. Also i need to add in the mouth so i can put in my blend shapes.
Cool. Storyboards to come.
Subscribe to:
Comments (Atom)